Wie kann man komfortabel in Java mit IDE unter Windows entwickeln und automatisch auf RASPI deployen?
https://blog.idrsolutions.com/2014/08/using-netbeans-remotely-deploy-projects-raspberry-pi/
netbeans installieren
java directory: /usr/lib/jvm/jdk-8-oracle-arm-vfp-hflt/jre
auf dem raspberry:
'/usr/lib/jvm/jdk-8-oracle-arm-vfp-hflt/jre/bin/java' -Dfile.encoding=UTF-8 -jar /home/pi/NetBeansProjects//RaspyProjekt/dist/RaspyProjekt.jar
Ergebnis der examples:wiringPiSetup: Must be root.
lösung unter platform konfiguration:
exec prefix: sudo
wichtig, ohne leerzeichen o.ä. eingeben!
Wie muss man den Schalter (Push Button) verkabeln?
"breadboard pushbutton pi4j ":
https://apotheosis9.wordpress.com/
projekt blink erfolg:
// create gpio controller
final GpioController gpio = GpioFactory.getInstance();
// provision gpio pin #01 as an output pin and turn on
final GpioPinDigitalOutput gelb = gpio.provisionDigitalOutputPin(RaspiPin.GPIO_01, "MyLED", PinState.LOW);
final GpioPinDigitalOutput rot = gpio.provisionDigitalOutputPin(RaspiPin.GPIO_03, "MyLED", PinState.HIGH);
// super dirty
for (;;) {
gelb.toggle();
rot.toggle();
Thread.sleep(500);
}
Weitere offene Tabs nach der Session:
https://apotheosis9.files.wordpress.com/2014/05/img_0540.jpg
https://apotheosis9.files.wordpress.com/2014/05/img_0542.jpg
https://www.google.de/search?q=breadboard+pushbutton+pi4j+listener&oq=breadboard+pushbutton+pi4j+listener+&aqs=chrome..69i57.11685j0j7&sourceid=chrome&es_sm=93&ie=UTF-8
http://pi4j.com/example/listener.html
http://pi4j.com/pins/model-2b-rev1.html
https://raspiprojekt.de/anleitungen/schaltungen/8-gpios-ansteuern-led.html?showall=1&limitstart=
http://pi4j.com/example/control.html
Donnerstag, 23. April 2015

Mittwoch, 8. April 2015
session 3: breadboards angekommen
nmap windows download und install:
https://nmap.org/download.html
mehrere wlan konfiguration ubuntu:
http://wiki.ubuntuusers.de/WLAN/wpa_supplicant
java installieren falls notwendig:
sudo apt-cache search java
sudo apt-get install <paketname> <paketname> <paketname>
howto java + tomcat:
http://www.element14.com/community/community/raspberry-pi/raspberrypi_projects/blog/2014/05/02/tomcat-on-my-pi
pi4j install && tool:
http://pi4j.com/utility/pi4j.html
http://pi4j.com/install.html
besser install per wget und dpkg (da die andere Installation per curl DOS formatiert ist ^M):
mkdir test
cd test
wget http://get.pi4j.com/download/pi4j-1.1-SNAPSHOT.deb
sudo dpkg --install pi4j-1.1-SNAPSHOT.deb
GPIO Port belegung:
http://pi4j.com/pins/model-2b-rev1.html
Beispiel 1 LED leuchten lassen:
nano /opt/pi4j/examples/ControlGpioExample.java
pi4j --compile /opt/pi4j/examples/ControlGpioExample.java
#+ javac -classpath '.:classes:*:classes:/opt/pi4j/lib/*' -d . /opt/pi4j/examples/ControlGpioExample.java
pi4j --run ControlGpioExample
✔
Pi getoastet und riecht komisch: ✔
@Christian: Bitte Sensor mitbringen.
https://nmap.org/download.html
mehrere wlan konfiguration ubuntu:
http://wiki.ubuntuusers.de/WLAN/wpa_supplicant
java installieren falls notwendig:
sudo apt-cache search java
sudo apt-get install <paketname> <paketname> <paketname>
howto java + tomcat:
http://www.element14.com/community/community/raspberry-pi/raspberrypi_projects/blog/2014/05/02/tomcat-on-my-pi
pi4j install && tool:
http://pi4j.com/utility/pi4j.html
http://pi4j.com/install.html
besser install per wget und dpkg (da die andere Installation per curl DOS formatiert ist ^M):
mkdir test
cd test
wget http://get.pi4j.com/download/pi4j-1.1-SNAPSHOT.deb
sudo dpkg --install pi4j-1.1-SNAPSHOT.deb
GPIO Port belegung:
http://pi4j.com/pins/model-2b-rev1.html
Beispiel 1 LED leuchten lassen:
nano /opt/pi4j/examples/ControlGpioExample.java
pi4j --compile /opt/pi4j/examples/ControlGpioExample.java
#+ javac -classpath '.:classes:*:classes:/opt/pi4j/lib/*' -d . /opt/pi4j/examples/ControlGpioExample.java
pi4j --run ControlGpioExample
Pi getoastet und riecht komisch: ✔
@Christian: Bitte Sensor mitbringen.
Mittwoch, 11. März 2015
Session 2: 20150311 Hardware ist angekommen und wird installiert
Image auf microsdhc Karte spielen:
Win32DiskImager
Image (vorher entpacken):
2015-02-16-raspbian-wheezy.zip
Konsolen Font Größe ändern:
http://www.raspberrypi-spy.co.uk/2014/04/how-to-change-the-command-line-font-size/
(W)Lan einrichten:http://www.raspberrypi-spy.co.uk/2014/04/how-to-change-the-command-line-font-size/
http://www.datenreise.de/raspberry-pi-wlan-einrichten-edimax/
sudo nano /etc/network/interfaces (über X-Server nicht mehr editierbar)
auto lo
iface lo inet loopback
#iface eth0 inet dhcp
iface eth0 inet static
address 192.168.1.150
netmask 255.255.255.0
gateway 192.168.1.1
#allow-hotplug wlan0
#iface wlan0 inet manual
#wpa-roam /etc/wpa_supplicant/wpa_supplicant.conf
iface default inet dhcp
auto wlan0
allow-hotplug wlan0
#iface wlan0 inet dhcp
iface wlan0 inet static
address 192.168.1.140
netmask 255.255.255.0
gateway 192.168.1.1
wpa-ap-scan 1
wpa-scan-ssid 1
wpa-ssid "xxxxxxxxx"
wpa-psk "xxxxxxxxxx"
GUI starten:
startx
GUI schliessen (nach Änderung Font Größe):
CTRL-ALT-Backspace
raspberry pi B+ / 2 breadboard GPIO (general purpose input output) Beschriftung:
Raspberry-Pi-GPIO-Layout-Model-B-Plus-rotated-2700x900
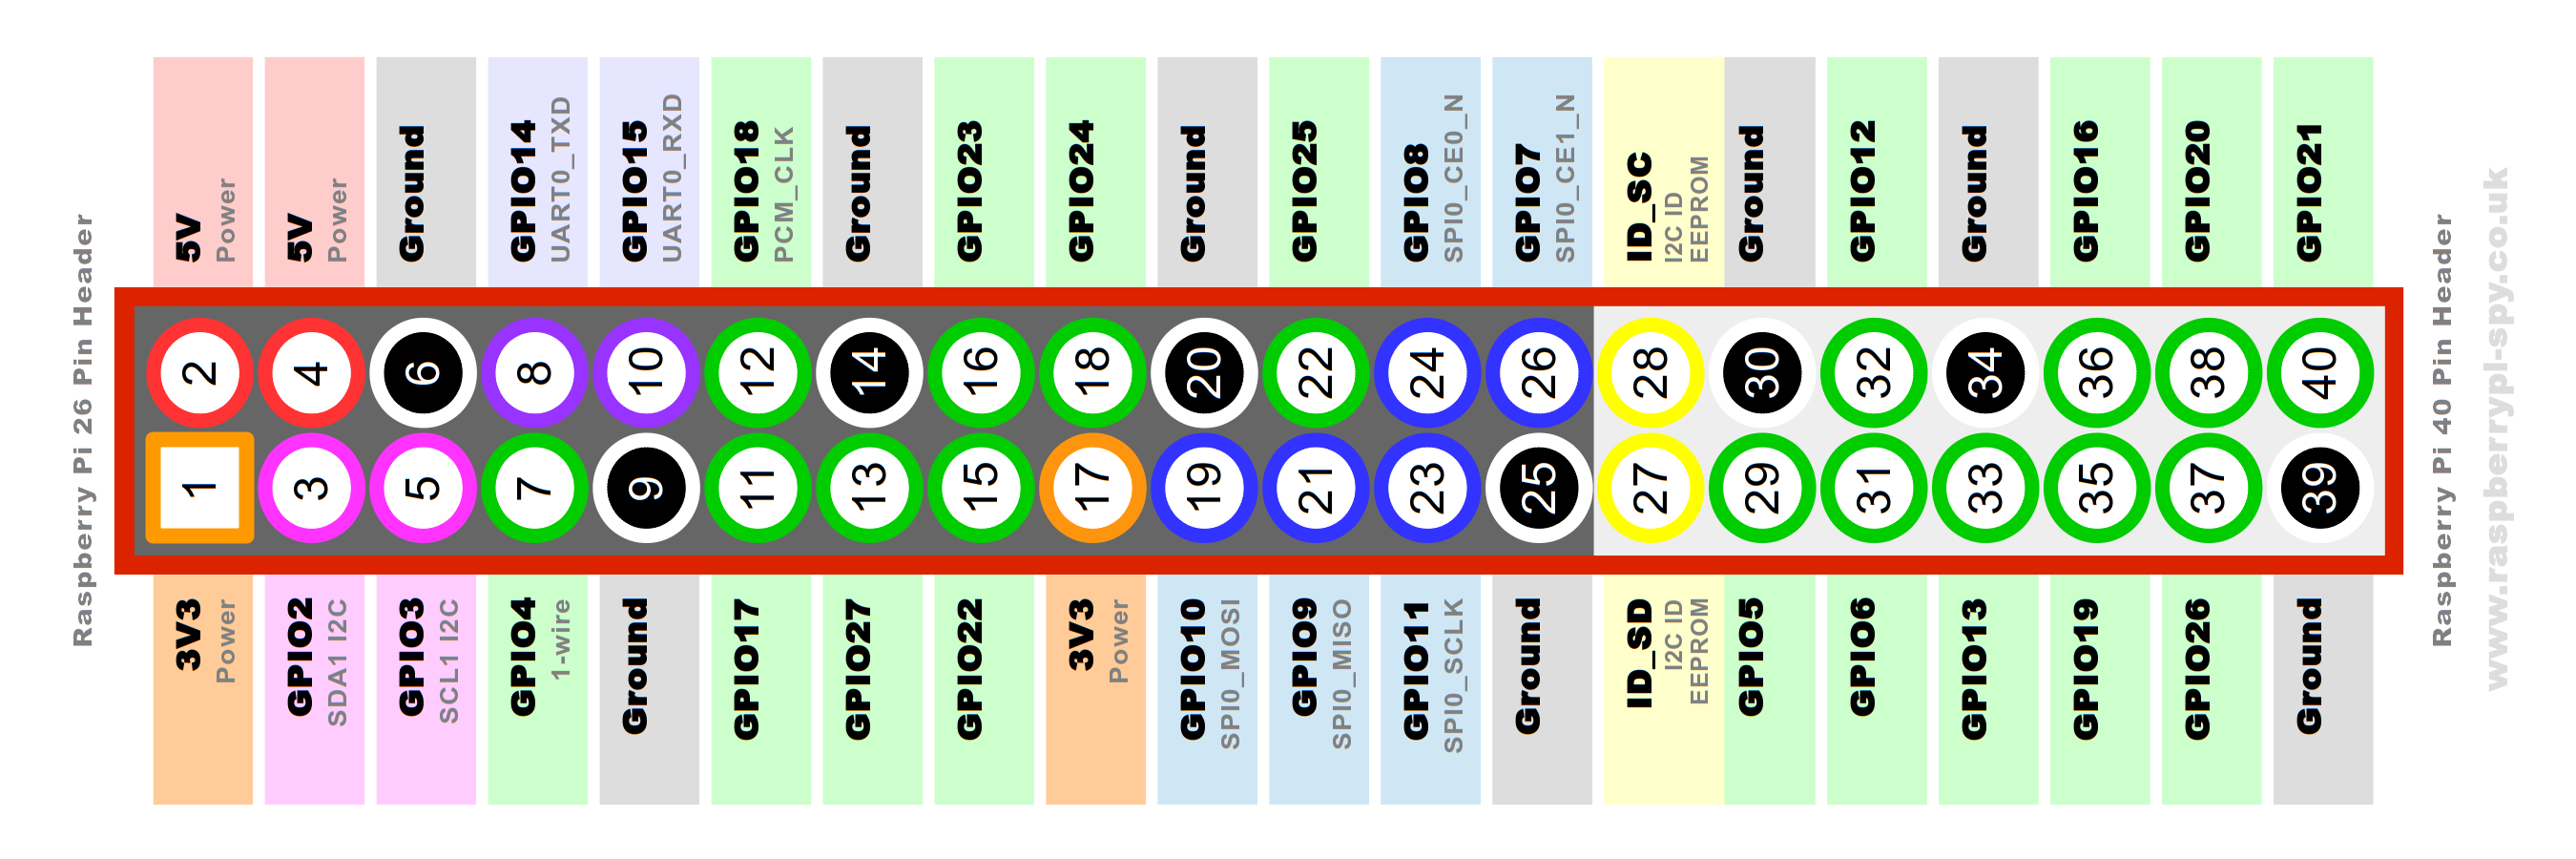
LED steuern über GPIO:
https://raspiprojekt.de/anleitungen/schaltungen/8-gpios-ansteuern-led.html?showall=1&limitstart=
http://raspberrypiguide.de/howtos/raspberry-pi-gpio-how-to/
Ziele:
- Bringen Sie eine LED zum leuchten ✔
- Schalten Sie eine LED ein und aus ✔
Java oder Python Anbindung:
- Lassen Sie eine LED blinken
- Lassen Sie eine LED blitzen
- Lassen Sie zwei LEDs abwechselnd blinken (Wechselblinker)
https://blogs.oracle.com/hinkmond/entry/rpi_and_java_embedded_gpio3
http://pi4j.com/example/control.html
http://pi4j.com/example/control.html
-------------------------------
Nachtrag:
Mehrere WLAN Accesspoints konfigurieren:
http://strobelstefan.org/?p=21
ab Schritt 4
Mittwoch, 4. März 2015
Abonnieren
Posts (Atom)